
Asana Sign In & Settings
The following is best completed on a computer internet browser as opposed to on your mobile app.
Step 1
After receiving your invite, sign in using google. If you do not have a gmail or gsuite account, then you will log in using your email and password.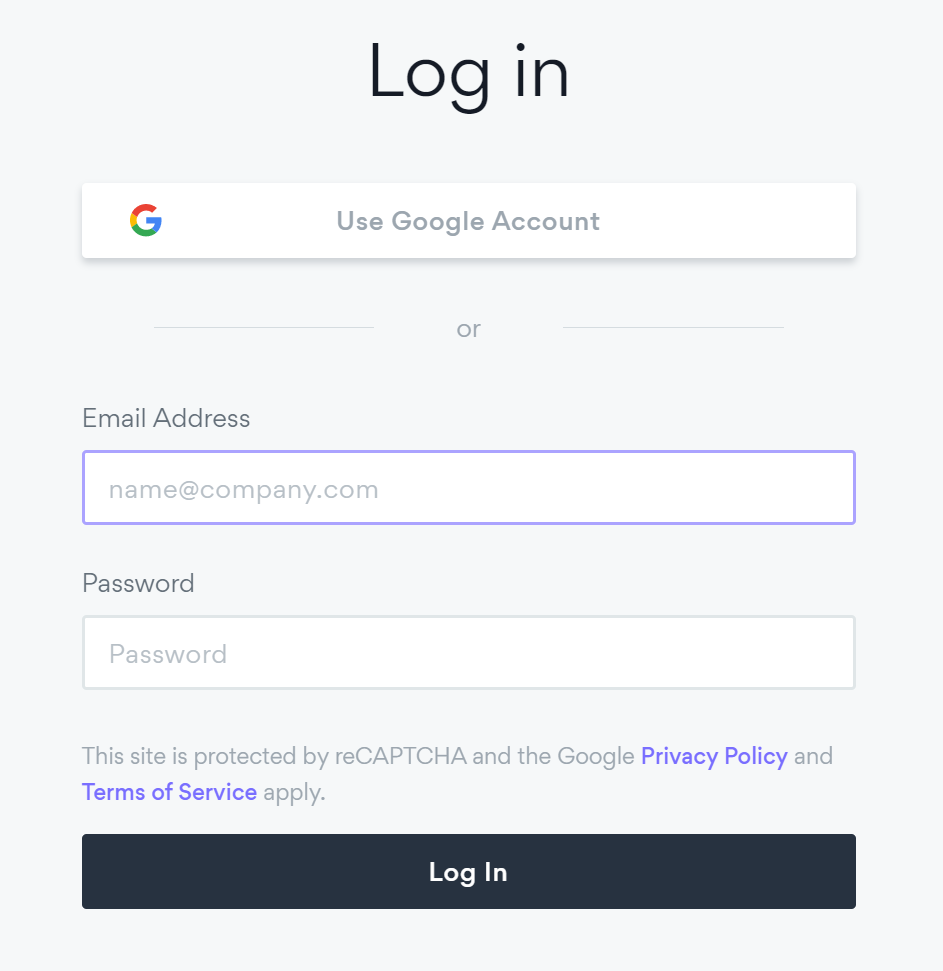
Step 2
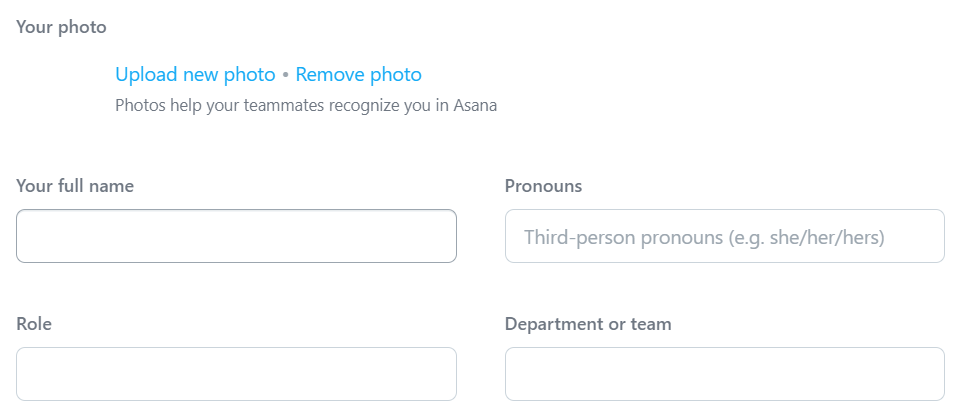
Set up your profile information
- Set your name
- Set a profile photo if desired
Step 3
Turn off Asana Email Notifications
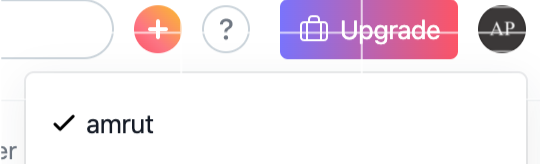
- Click on your profile in the top right corner of asana
- Select My Profile Settings > Notifications
- Turn off all Email Notifications
- Turn off all Browser Notifications

Step 4
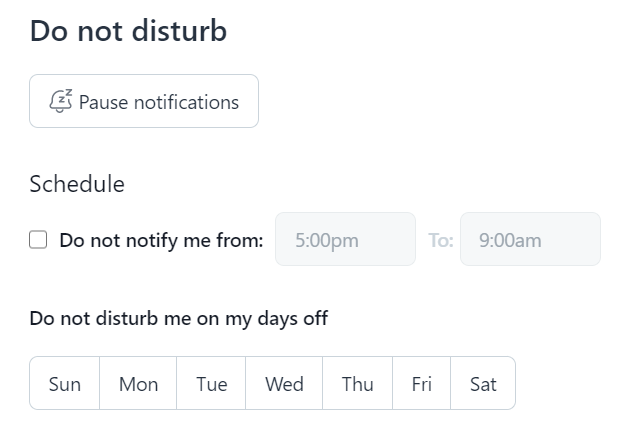
Check Work Hours
- If possible, avoid setting any "do not disturb" settings from within asana, especially for Managers & Maintenance Engineers.
- Do not disable notifications during work hours.
- Managers should not disable notifications during Monday through Friday 8a-5p regardless of work hours.
- Maintenance Engineers should not disable notifications after hours.
Step 5
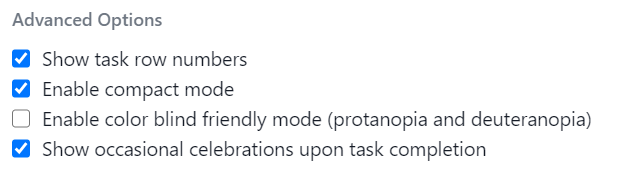
Adjust your display settings
- In My Profile Settings > Display
- Customize your advanced options. The following options are suggested.
Step 6
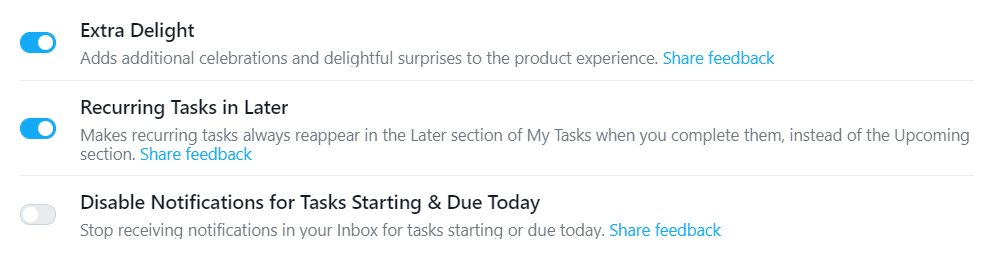
Adjust your hacks
- In My Profile Settings > Hacks
- Customize your hacks. The following options are suggested.
Change Profile Email Address
If you already have an asana profile, you will need to follow the follow these instructions to ensure the correct email address is used.
Step 1
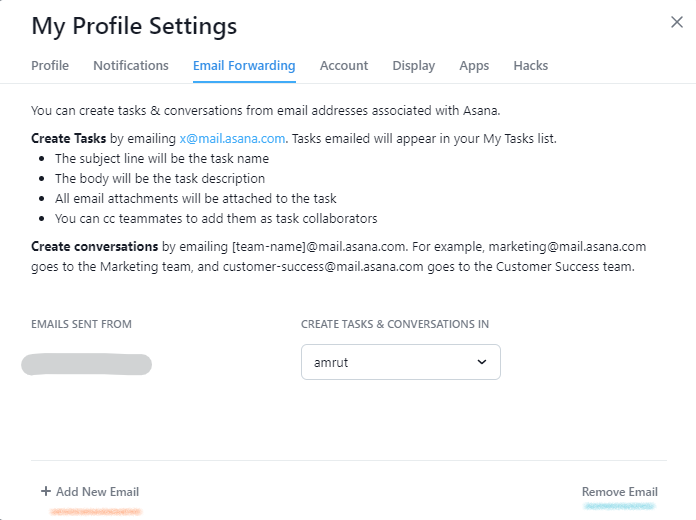
In the top right corner, click on your Profile Icon > My Profile Settings > Email Forwarding
Step 2
Select + Add New Email, fill in the correct email, and select Reauthenticate . When reauthenticating, sign in with the original email address.
Step 3
After the correct email address appears in the list, select Remove Email and remove all other email addresses.
Asana Basics
More topics are covered here, as task basics, projects, status updates, collaboration, portfolios, and so on.
Creating Tasks & Task Actions
Tasks are the basic unit of action in Asana. You can; create new tasks, duplicate an existing task, merge two tasks together, print a task or delete a task.
For more visuals and other topics relating to, please refer to the Task Actions Page by Asana
Creating Tasks
- Start by selecting any existing task in the main pane.
- Press ENTER on your keyboard,
- Type in your task name.
There are also other ways to add tasks:
- Click the Add Task button near the top of the main pane.
- There is also an new task entry row, under the last task of any list.
- From the Quick Add Task window.
- Press `TAB+Q` on your keyboard to open up the quick add task box.
- From the Quick Add Task window, you can: Name the task, assign the task, attach the task to a project, add a task description and many more things.
Action Tasks
You can take action on the tasks by clicking the three dot icon in the right pane and select from the task action menu.
From this menu, you can:
- Enter full screen mode
- Add to projects
- Mark as Milestone
- Make dependent
- Add tags
- Duplicate task
- Create follow-up task
- Make task public
- Access advanced actions
Duplicating/Merging Tasks
To duplicate a task:- Click the three dot icon from the right pane
- Select Duplicate Task
- Identify the components of the task you want to see in the duplicate
- Select Create New Task
- Click the three dot icon from the right pane and select Merge Duplicate Tasks
- Begin typing the task's name you wish to merge with or select one in the dropdown
- Locate the duplicate task and click
Convert to Project
To convert a task into a project:- Click the three dot icon from the right pane
- Navigate to Advanced actions and from the drop-down menu choose Convert to a Project
- Enter the project's name
- Select the team you would like to add the project to
- Identify what fields you would like to convert
- Select Convert
- After a task is converted into a project, many of its details will convert over to the new project.
Adding a Task to a Project
To add a Task to a Project:- Click the three dot icon from the right pane
- Hover over Add to another Project and click through
- You now have the option to Add to a Project
- Select the Project you would like to add the Task to
- Click the + from the right pane under Projects
- Hover over Add this task to another project and click through
- A list of Project options will appear as before to choose from
Print a Task
To print a single task:- Click the three dot icon from the right pane
- Select Print
Delete Tasks
If you create a task in error or decide it's unnecessary, you can delete it.
There are two ways to delete a task:- From the main pane: click into/select the desired task and press Tab+Backspace on your keyboard
- From the right pane: Click the three dots icon and select Delete Task from the drop down menu
Task Fields & Tags
All task fields can be found and modified from the right pane. Click any task to reveal its details in the right pane. The right pane holds the details of a task or Conversation.
Marking tasks Complete & Incomplete
You can mark a task complete by either:- Clicking the check icon from the left pane
- Clicking the Mark Complete button from the right pane
Conversely, you can mark a task incomplete again if there is still work to be done.
To mark a task incomplete again:- Click the Completed button from the right pane
Due Dates & Times
Set a due date, due time, or a date range to let your teammates know when a task should be completed by.To add a Due Date:
- Navigate to Due Date and either type a date or select it from the Calendar.
- Enter a time from the Due Time bar
- From your Calendar, you can specify time frames from Start date to Due Date.
Recurring Tasks
If you have a task that you need to complete on a regular basis, you can set it up as a recurring task. When a recurring task is marked complete, it will duplicate all the information into a new task with a new due date. The interval you've set for your task's recurrence will determine the new due date.
View this page for more Recurring Task Quick Tips
Assignee & Collaborators
Every task can only have one assignee, while it can have many collaborators. Both a task's assignee and collaborator can edit the task.To Assign a Task
To assign a task:- Click the Assignee field from the right pane
- Begin typing the person's name or email address
- Select the person from the autocomplete results
To Unassign a Task
To unassign a task:- Go to the Assignee field and click the X icon that appears
Assign Copies
To assign multiple copies of a task:- Click the Assignee field in the right pane
- Select Assign duplicate tasks from the drop-down menu
- Choose from the list who you are going to assign a duplicate to
- Click Assign duplicate
Add a Collaborator
To add a Collaborator to a task:- Click the + button beside Collaborators to add or remove your collaborators
- You can also add a collaborator by typing their name or email and selecting them in the autocomplete results
Leaving a Task
To leave a task:- Click the Leave Task button
- OR to remove a collaborator by hovering over their name and clicking the X icon
Dependencies & Subtasks
With task dependencies:- You can mark a task as waiting on another task.
- Dependencies are the relationships among tasks which determine the order in which activities need to be performed.
- Teams with collaborative workflows can easily see what tasks they’re waiting on from others, and know when to get started on their portion of work.
- When the first task is completed, it will notify the assignee of the next task that they can start on their task.
Using subtasks:
- To break up the work of a task into smaller parts or to help divide up the work among multiple people.
- Subtasks function like independent tasks with all the same fields as a parent task, but are embedded within a parent task.
To view more detailed instructions & visuals regarding:
Comments & Attachments
Comment on a task to ask questions, provide extra information, or offer insight. A task's comments will appear at the bottom of the right pane. Anyone with access to a task will see its comments.
To post a comment:- Click into the comment field, type a comment, and click the Comment button.
- Hover over the comment and click the drop down arrow that appears
- Select Edit Comment
- Select Delete Comment
From here, you can attach photos and files as well.
For more details on Comments & Attachments, click here.
Weekly Status Update
Most of the asana projects should have a regular status update.- Go to the overview page of the project for which you want to provide a status update
- On the top right corner, there will be an option to begin your status update.
- Refer to the Hotel Setup on Asana article (link) to determine what content to include in the status update.
- Do not overdo the status update. It should be consolidated & brief.
Asana Projects
Projects allow you to organize all of the tasks related to a specific initiative, goal, or big piece of work into a list or board.
Creating & Setting Up a New Project
To create a new project:- Click the omnibutton
- Select Project
- A new screen will present you with 3 options where you can either, create a Blank project, Use a template or Import spreadsheet.
- Click on + in the Blank project window to start from scratch.
Set up your new project:
- Once you click on Blank Project, you’ll be able to fill in your project details, select your layout, and set your privacy settings.
- Enter a project name and description
- Select the team you wish to add the project to
- Set your project privacy settings
- Select a list, board, timeline, or calendar layout
- Create a project once the details have been added
Creating sections for your project:
Sections allow you to divide and organize the tasks in your project. Sections can be used to create categories, workflow stages, priorities, and more.
Create a Section
To create a Section in your project:- Click the dropdown arrow next to the Add Task button
- Click Add Section
Delete a Section
To delete a section:- Click on the three dot icon next to the section header
- Select Delete Section
Collapsible Sections
Sections can be expanded and collapsed as required.
Click on the arrow next to a section and you can expand and collapse the tasks under the section.
For more visuals and details about Sections, click here.
Project Permissions
How do I share a private project?- Cick the share button in project view
- A pop up window will give you the opportunity to invite a member with a link
- Add project member by name or email
How to make a private project public:
- Click the Make public to [Team Name] in the bottom right corner of the Share screen.
How do I limit access to a private project?
- You can manage all notifications from this share pop up window.
- You can determine which project member can edit, or just comment only, change the owner of the project or remove a member from the project.
How to give members access to a project or remove:
- Across from each member’s name there is a drop down menu with access to 4 permissions
- From the drop down you give give members certain rights by choosing one of the options
For more details about project permissions, click here.
https://asana.com/guide/help/projects/people
Project Actions
There are many available actions you can take on your projects in Asana. The actions shown below apply to projects, Search Views and My Tasks will have variations of these.
You can view more project actions not listed, here.
Duplicate Project
To duplicate a project:- Click the drop down arrow next to the project's title
- Select Duplicate Project
Move Project
To move a project to another Team:- Click the drop down arrow
- Select Move to Another Team
- Select the destination team (the checkmark indicates the Team the project currently resides in)
Import Project
You can import tasks to a project in Asana using CSV:- Select the project header dropdown menu next to your project‘s name, hover over Import then choose CSV.
- Follow the instructions that follow, choosing the project to which you'd like to add your CSV file and the Organization it lives in.
- To import projects or tasks into Asana, you can also duplicate the tasks you’d like to move to Asana as a list, and paste that list into a project. Asana will automatically create a new task after each line break.
Export Project
You can export your project to the text-based file formats JSON or CSV. Aside from projects, you can also export a Search View or your My Tasks.To export a project:
- Click the drop down arrow next to the project's title
- Hover over Export/Print
- Select your desired file type
Archive Project
Archiving a project allows you to focus on more active projects.To archive a project:
- Click the drop down arrow
- Select Archive Project
You can view more project actions not listed, here.
Great Uses for Project Overview & Dashboards
Project Overview is the team's persistent hub to showcase a birds-eye view of the what, why and how of a project and drive easy understanding of its ongoing context.
Project Description
A project description allows you to welcome your team and set the tone for how you’ll work together in Asana. You can add meeting details, communication channels and other important information.
To add your description, click into the description field and start typing.
Editing Details
To access or edit your project details:- Click on the drop-down arrow next to your project header.
- Next, select Edit project details.
Assign Roles
Under the Project roles section of your Project Overview you can easily view the Project Owner for your project, as well as assign roles such as Approver, Contributor or another role of your choosing.Editing a current role:
- Click the drop-down arrow next to the member’s name.
- From the drop-down menu, you can:
- Change the role
- Set the member as the Project Owner
- Remove the member from the project
- Add a role
- From the drop-down menu, you can:
To add a role:
- Click the drop-down arrow next to the member's name
- Then click Add Role.
- Next, simply type the name of the role into the text field and click done.
Overseeing Milestones
Project Milestones are accessible and visible on your Project Overview. Click into any Milestone to view or edit its details.
Progress & Status Updates
You can view the progress or update the status of any project you’re working on from your Project Overview tab. The project progress section gives you an in depth snapshot into the status of any Project you’re working on. Status reports make it easy to create rich, repeatable, actionable status updates and share your work with key stakeholders.
You can quickly create a new Status Update:
- Click the Update status icon from your Project’s progress view
You can find more information about project overviews here. Or you can access more information about status updates here.
Project Dashboards
Dashboards are project-level tabs containing graphs and visualizations that let you zoom out from the day to day to quickly understand your team’s progress. These charts help to instantly identify potential blockers in your team’s work and subsequently move the project forward.
The Dashboard tab is a good reference point to find data to get a quick pulse on how the project is progressing.
To learn more about utilizing the project dashboards, click here.